Setup
Find DC IPs
Enumerate and confirm the Domain Controllers of the target domain by DNS via nslookup or dig
nslookup -type=srv _ldap._tcp.dc._msdcs.sevenkingdoms.local 192.168.10.10
nslookup -type=srv _ldap._tcp.dc._msdcs.buildcyber.north.sevenkingdoms.local 192.168.10.10
nslookup -type=srv _ldap._tcp.dc._msdcs.essos.local 192.168.10.10

Configure Kerberos on Linux
In order to use kerberos authentication and related tradecraft, we will have to do some configurations to our Linux machine.
- First we need to setup DNS so that the machines will resolve correctly. We can accomplish this by editing our /etc/host file & by using the Linux kerberos client package.
Editing /etc/hosts file
sudo nano /etc/hosts

# add below to /etc/hosts file
# Red Seer Labs: GOADv2
192.168.10.10   sevenkingdoms.local kingslanding.sevenkingdoms.local kingslanding
192.168.10.11   winterfell.north.sevenkingdoms.local north.sevenkingdoms.local winterfell
192.168.10.12   essos.local meereen.essos.local meereen
192.168.10.22   castelblack.north.sevenkingdoms.local castelblack
192.168.10.23   braavos.essos.local braavos

Setting up Kerberos Client
Next we need to install and set up the kerberos linux client.
sudo apt install krb5-user
# if you already have this installed and need to change its configuration run: 'sudo dpkg-reconfigure krb5-config'
After the package is installed we need to edit the /etc/krb5.conf settings to finish the setup.
[libdefaults]
        default_realm = essos.local

# The following krb5.conf variables are only for MIT Kerberos.
        kdc_timesync = 1
        ccache_type = 4
        forwardable = true
        proxiable = true
        rdns = false


# The following libdefaults parameters are only for Heimdal Kerberos.
        fcc-mit-ticketflags = true

[realms]
        essos.local = {
                kdc = meereen.essos.local
                admin_server = meereen.essos.local
        }
        sevenkingdoms.local = {
                kdc = kingslanding.sevenkingdoms.local
                admin_server = kingslanding.sevenkingdoms.local
        }
        north.sevenkingdoms.local = {
                kdc = winterfell.north.sevenkingdoms.local
                admin_server = winterfell.north.sevenkingdoms.local
        }

[domain_realm]
        .mit.edu = ATHENA.MIT.EDU
        mit.edu = ATHENA.MIT.EDU
        .media.mit.edu = MEDIA-LAB.MIT.EDU
        media.mit.edu = MEDIA-LAB.MIT.EDU
        .csail.mit.edu = CSAIL.MIT.EDU
        csail.mit.edu = CSAIL.MIT.EDU
        .whoi.edu = ATHENA.MIT.EDU
        whoi.edu = ATHENA.MIT.EDU
        .stanford.edu = stanford.edu
        .slac.stanford.edu = SLAC.STANFORD.EDU
        .toronto.edu = UTORONTO.CA
        .utoronto.ca = UTORONTO.CA

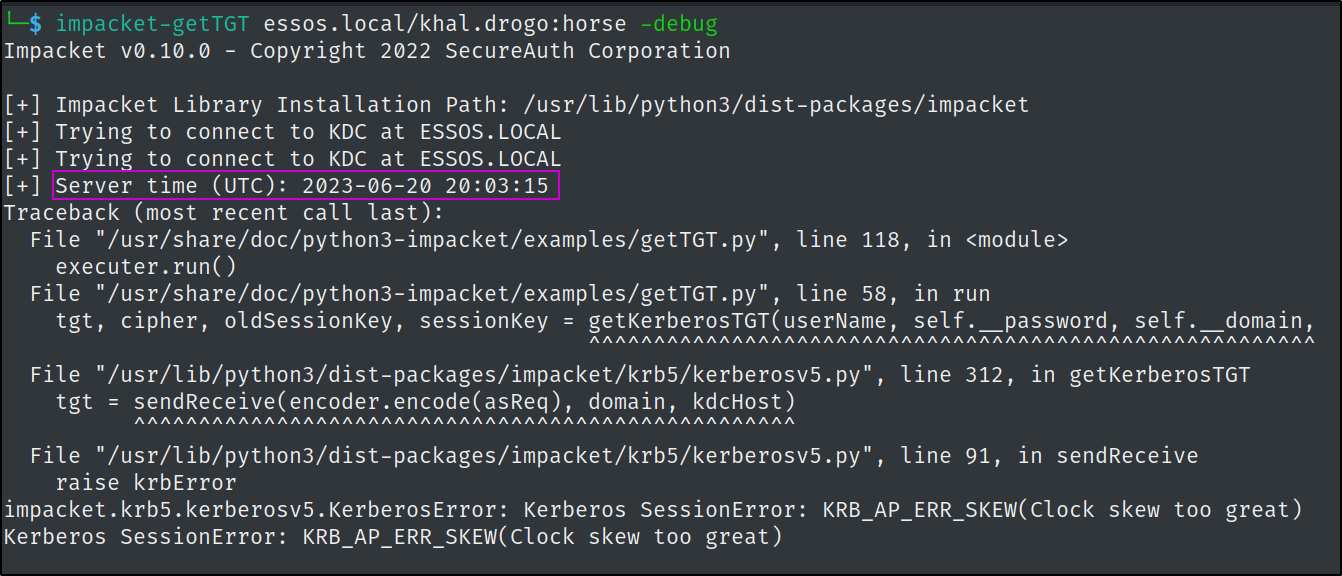
Thankfully, the error is nice enough to tell us the problem.
Kerberos is very particular about clocks syncing up closely to the Domain Controllers, and our system clock isn't matching the essos.local domain controller's. Which kinda makes sense if you think about our targets operating out of a fictional universe.
We can use the -debug parameter of the same tool to figure out what the exact time the DC is looking for and then spoof ours to sync up using the faketime application.

 So this tells us that our times are way different from our system's local time, AND that the target enterprise environment is using UTC as well and not EST in my case.
# we could also use 'ntpdate' to change our entire system clock if we wanted...however this will change our entire vms clock...which might not always be something you want or can do
# sudo ntpdate <dc we want to sync to IP>

sudo apt install faketime
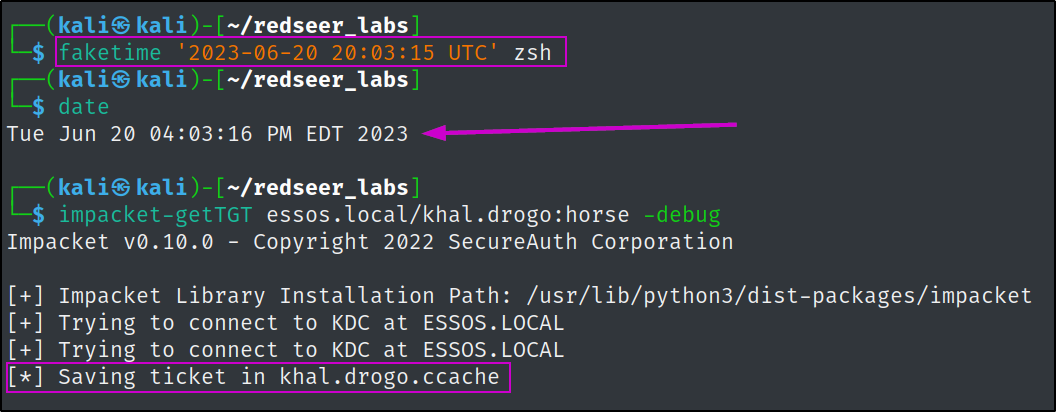
Now we can utilize faketime to spoof whatever time, timezone and convention we wish, so we can match the KDC of our target's environment.
# faketime 'time we want to spoof and such` <command to execute with faked time>
faketime '2023-06-20 20:03:15 UTC' zsh
Finally, we can successfully obtain a valid kerberos TGT! 

Testing Kerberos Auth
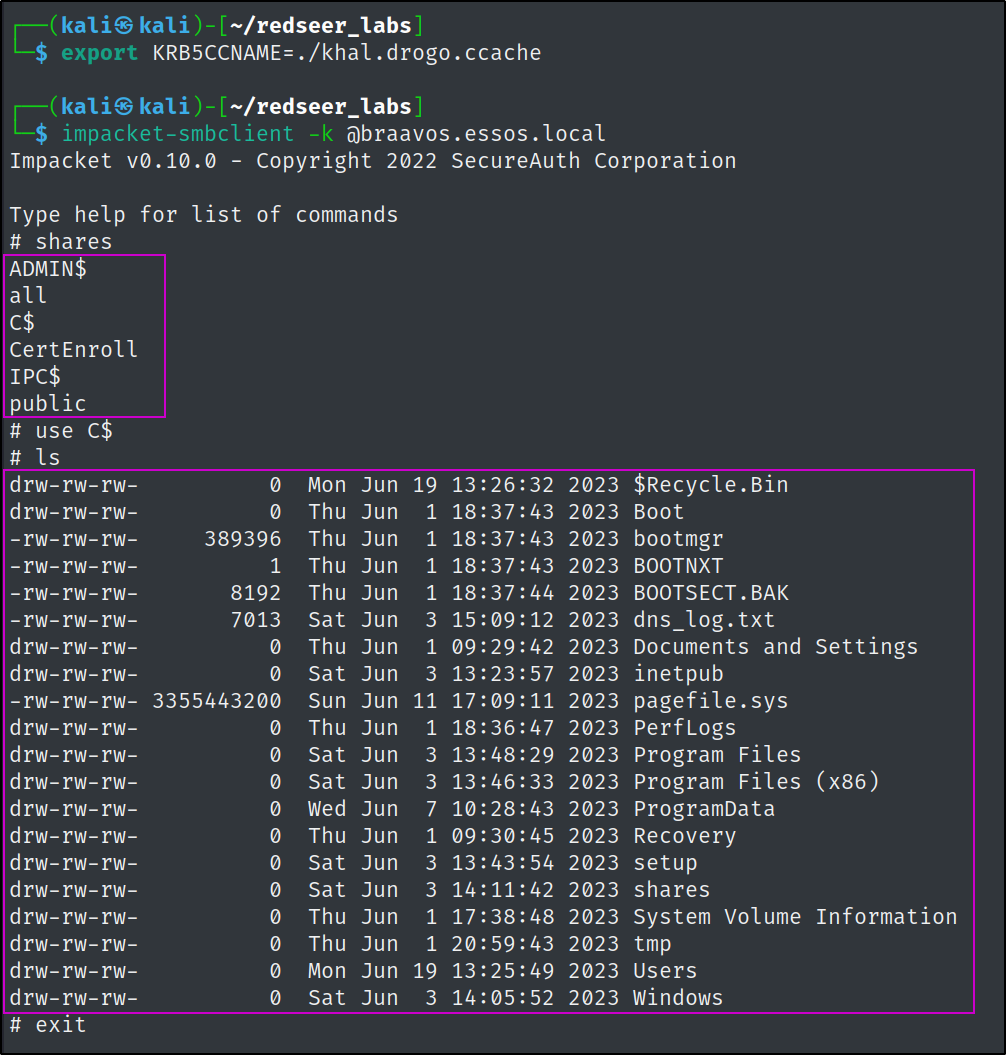
Lets check to make certain everything is working correctly by using the TGT to try to connect to some network shares.
export KRB5CCNAME=./khal.drogo.ccache

impacket-smbclient -k @braavos.essos.local
# shares
# use C$
# ls

Congratulations! We are all ready to start our pentest! Next: Attacking Part 1-Finding Users


